How-tos
How to edit this website
The main goal of this website is the collaboration. We therefore invite you to edit it, adding the information you have, modifying incomplete instructions or sharing interesting articles. This section explains how to edit properly the website.
Instructions
The website content is hosted on GitLab. Editing this content therefore recquires the use of that platform. The easiest way to do so is to click on the pencil icon at the top of the page you want to edit.
![]()
This will open the markdown file in the GitLab environment. By clicking on 'Edit', you will be able to edit it. Two different cases:
- You are a maintainer : you can edit and commit the site without any restriction.
- You are not a maintainer : to edit, you will need to fork the project and your commit will be submitted for approval from the maintainers.
Long story short : ask to be a maintainer, take responsabilities, take part!
Please find some guidelines for the edition of the website here
An example of Abel Transform in python
You can find here an python notebook with a simple application on Abel Transform to beam dynamics.
To connect to your OpenStack WIN with a "stable" tunnel
During the COVID19 teleworking period, sometimes I esperienced hiccups in the LXPLUS tunneling connection, most likely due to the node's overload. One solution is to use the dedicated windows gateways. I put together here few steps suggested by G. Iadarola.
Some pyspark examples
We collect in this ipynb some examples to use pyspark with SWAN and NXCALS for data analysis in the Injectors and for LHC. You can open and download it here.
Make mkdocs with ipynb
If you want to integrate some ipynb as mkdocs documentation (for example to profit from its search capability) you can follow the approach described here.
How to connect to Mathematica via a tunnel
You can install Mathematica from the DFS server and run the license server via a tunnel.
Instructions
-
Download it from https://dfs.cern.ch/dfs/Applications/Wolfram Research/Mathematica (you can open it on a mac via Finder and Command+k) and install it.
-
you establish this tunnel (replace your_account_login)
ssh your_account_login@lxplus.cern.ch -L 16286:lxlicen04:16286 -L 16287:lxlicen04:16287
- and, at the start of Mathematica, you specify the server name as "localhost".
How to connect to redirect web traffic on CERN GPN
If you want to access web pages as from the CERN General Public Network you can use the following tricks. This can be useful to access wikis.cern.ch, timber.cern.ch/, or issues.cern.ch...
Instructions
- Create a socks via ssh to lxplus (ssh -D 8888 lxplus.cern.ch)
- configure your system preferences (OSX) to use as SOCKS proxy "localhost:8888". It should be equivalent in other OS (just google it).
How to extract data with cl2pd
Please have a look to this notebook for an introduction to the cl2pd. You can see also an example of analysis of an LHC fill here.
How to evaluate the effect of a beam-beam element using MAD-X
Beam-beam elements in MAD-X might look mysterious, especially when it comes to their effect on the orbit. In this section we explain how to use MAD-X, through the python wrapper cpymad. A reference notebook can also be downloaded by clicking here.
How to create your own lxplus-like machine
You might have experienced that lxplus machines can be a bit busy and therefore slow. If you are interested in having such a machine where the only user consumming the available ressources is you, this tutorial is made for you. Follow the steps described here.
How to make such a nice website
From the incredible help of D. Gamba (info available here) this section gives an overview of how such a website can be done. The markdown files are hosted on GitLab, and the website is hosted by the web service of CERN. To create the link between the two, the objectif is to create a PaaS application using the OpenShift service and the MKDocs. In the following, we present the instruction provided by D. Gamba.
Instructions
To setup an MKDocs website, a series of very simple instructions have to be followed. They are presented here.
- The first step is to request the creation of a PaaS official website from the CERN web service. Choose a name, enter a description, and choose 'PaaS application'. Once the request is done, it can take up to 20 minutes for the project to be created.
- Create a simple GitLab project. It can be empty at the moment.
- Then it's time to create a MKDocs application. This is done through the configuration pannel of the OpenShift service. From there, one can create MKDocs application. You have to choose between your different websites, and to enter the link of the corresponding GitLab project. When you enter the link, do not omit the ".git" at the end.
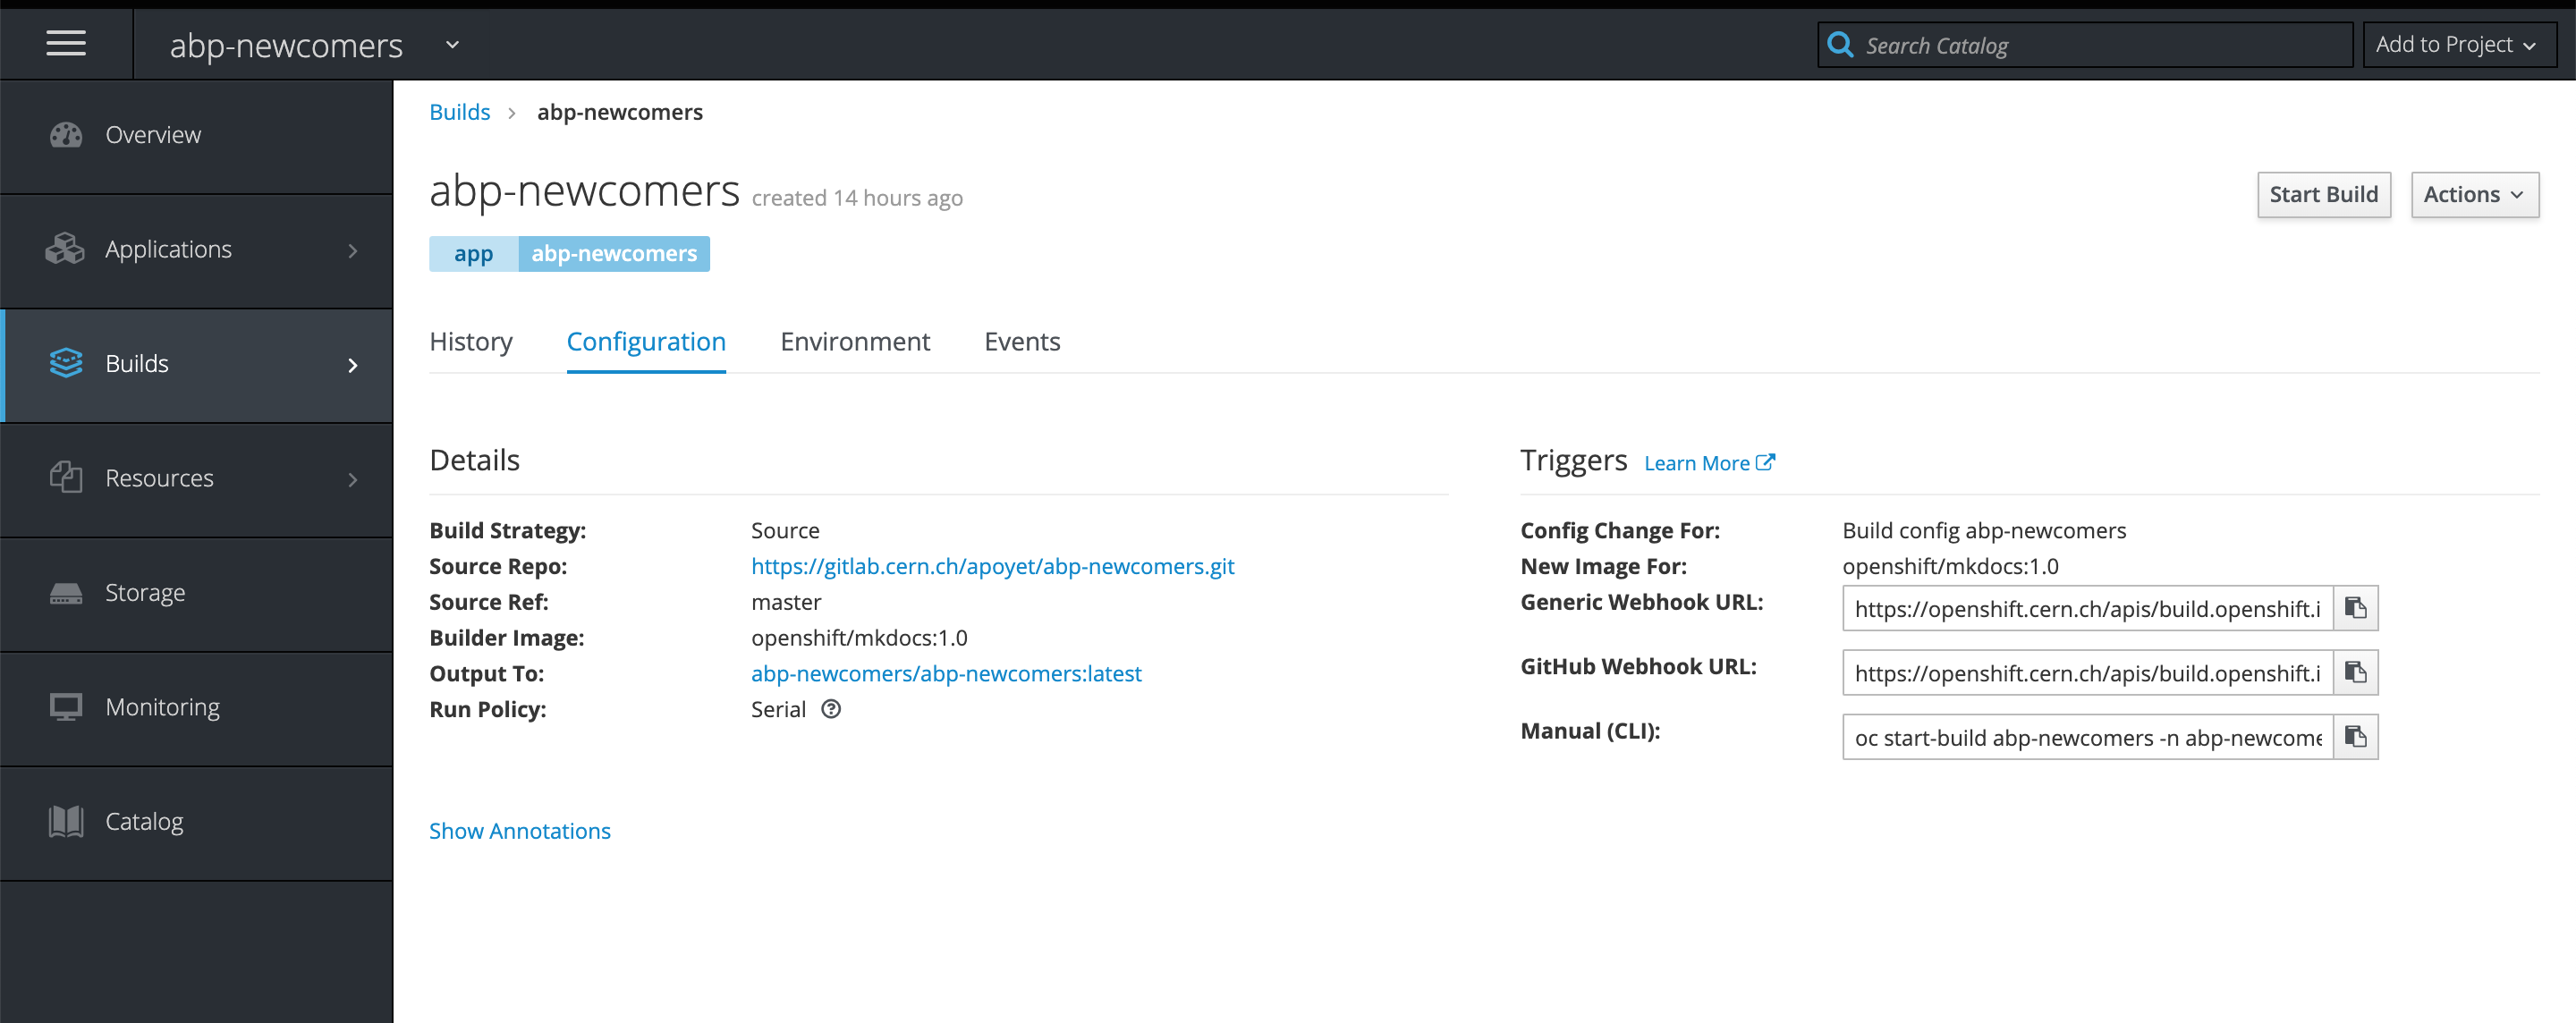
- In order to trigger a re-build action when you push on Git, you need to create a webhook. This is done in two steps. First, you need to go to the build configuration of your website on OpenShift, and get the "Generic Webhook URL".
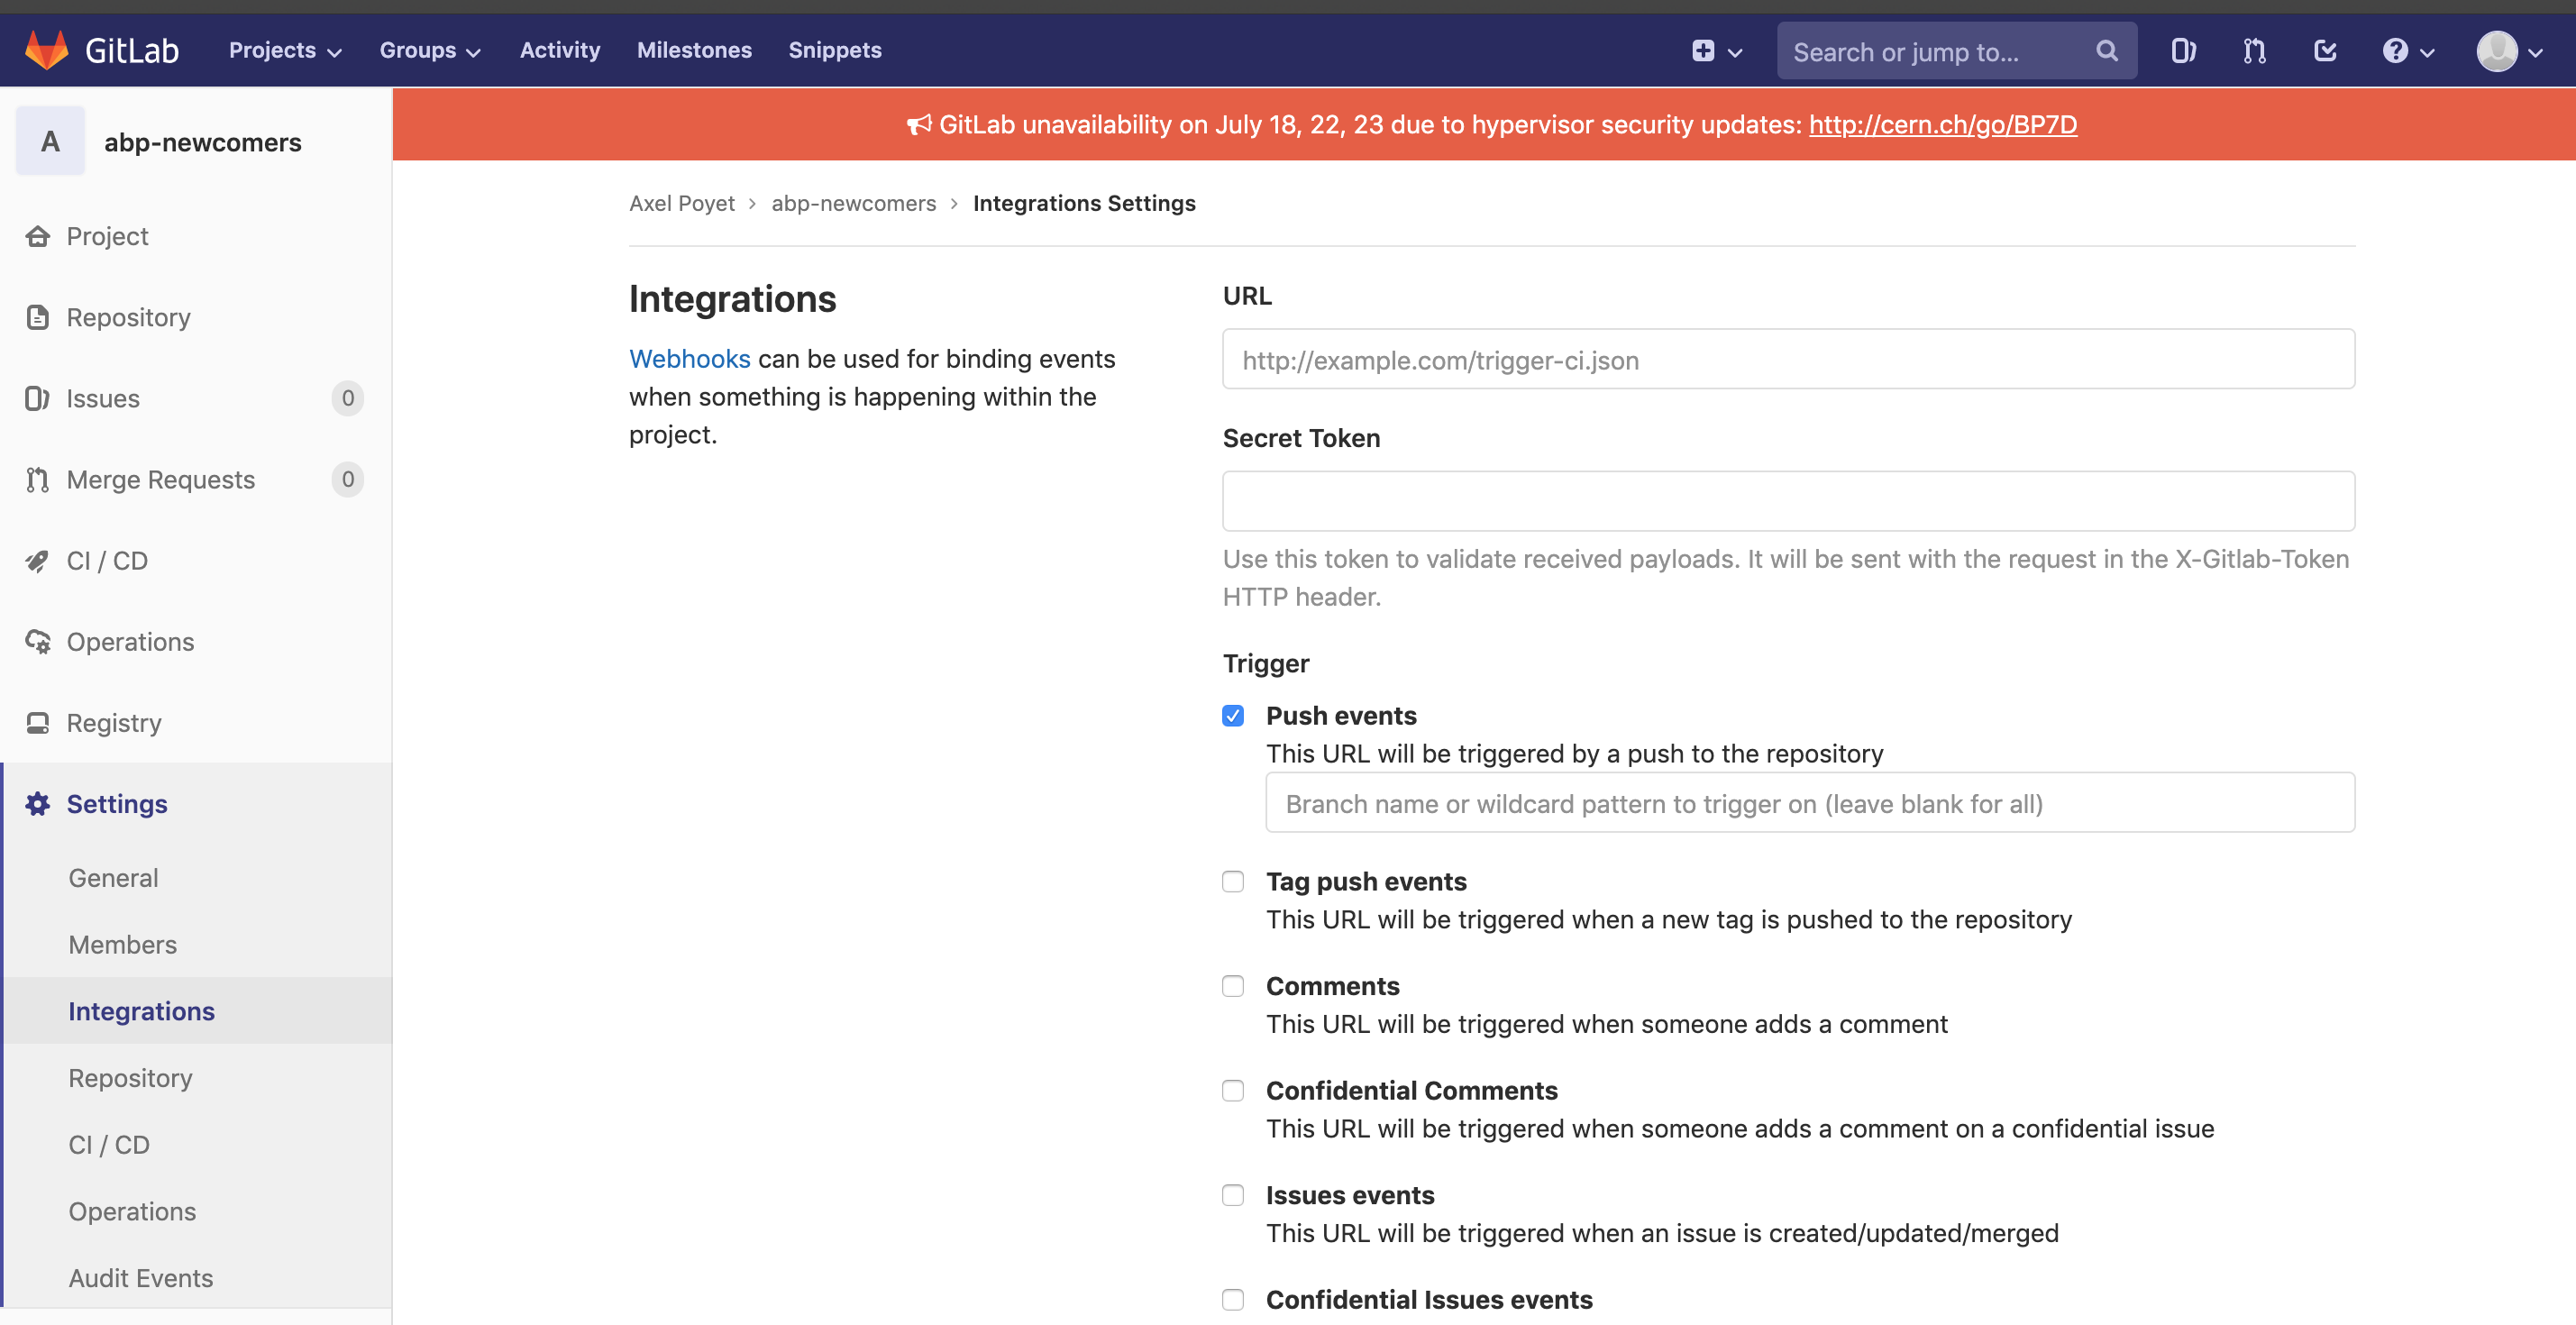
 You can then paste this link in the Integrations settings of your GitLab project.
- Enjoy your website! In order to start, we strongly encourage you to follow the structure of this present website (check on GitLab to get the starting files, typically the "mkdocs.yml" in the main repository).
Another example of such a website has been done for the newcomers in the ABP groupe here.
How to submit a study (multiple jobs) to HTCondor using Python
In order to ease the submission of jobs to the CERN cluster system (HTCondor), pyHTC allows the user to submit multiple jobs through python scripts or notebook while organising the data and the output paths in DataFrame. This should improve the working flow.
In this section we propose a simple example to understand the mechanism of the package. The details are given on the following page.
How to use cpymad and the CERN lattices
CERN machines lattices are generally generated using the MAD-X code. cpymad is a python package allowing to use MAD-X with a python wraper.
Some Examples
Here we report a minimal setup to run with cpymad some lattices of the CERN accelerator complex (click here to download the ipynb).
The repositories of the optics are not the most recent ones and have to be considered as examples.
How to import the elogbook in a pandas dataframe
The elogbook team (S. Pasinelli et al.) is working in a REST API interface to retrieve from the General Public Networg (GPN) the elogbook information. In the meantime, you can use general web scraping techniques to get the data. An example can be found here and can be downloaded here.
How to handle versionning using LCG releases and lxplus
In order to maintain your code or notebooks in the futures, it is important to be sure that you keep using the same distributions. In the case of python at CERN, here are some tips in order not to get lost after some months.
Instructions and information
You can find the packages for a specific LHC Computing Grid distributions (called stacks) here. The stacks are available on cvmfs (CERN Virtual Machines File System). Lxplus is mounting cvmfs togheter with afs and eos. You can configure a special LCG stack on Lxplus with the command similar to the following
source /cvmfs/sft.cern.ch/lcg/views/LCG_95apython3/x86_64-centos7-gcc7-opt/setup.sh
where you will specify the address of the specific LCG you want to use.
For results reproducibily is useful to document the stack you are using.
How to Run a Jupyter Notebook from lxplus
Presently SWAN servers do not mount AFS. If you want to access AFS in a SWAN-like enviroment (e.g., launching batch jobs) you can launch a jupyter server on lxplus using a specific LCG stack.
Instructions
You can do that by opening a tunnel:
ssh -L 8099:localhost:8095 sterbini@lxplus.cern.ch
source /cvmfs/sft.cern.ch/lcg/views/LCG_95apython3/x86_64-centos7-gcc7-opt/setup.sh
jupyter notebook --no-browser --port=8095
In order to simplify the process, one can consider adding an alias in the .bashrc / .zshrc like the following:
ssh-tunnel='ssh -L 8099:localhost:8095 apoyet@lxplus.cern.ch "jupyter notebook --no-browser --ip=127.0.0.1 --port 8095"'
While connecting with your browser to the local port, you will be asked to enter a token that is given in your terminal window when you run your ssh-tunnel alias, or to set a password in order to avoid entering the token every time you connect (recommended).
How To Tag a Plot
We are producing a lot of plots and using there for publication, presentations or just brainstorming. It is a good practice to tag the plot with the full path of the ipynb you used to make it. This will help you to recover and edit the plot.
Function
A simple function to do that is
def setSourcePlot(gca, pltDescription,x=0.99,y=0.01,horizontalalignment='right',\
                  color='k',verticalalignment='bottom',rotation=0,fontsize=7):
  '''
  Comment the plot adding for instance the source script.

  It requires an axis (gca) and a string (pltDescription).

  ===EXAMPLE===
  plt.plot([1,2,3,])
  pltDescription='/eos/...'
  setSourcePlot(plt.gca(), pltDescription,x=0.99,y=0.01,horizontalalignment='right',\
                  color='k',verticalalignment='bottom',rotation=0,fontsize=7)
  '''
  plt.text(x,y,pltDescription,
             horizontalalignment=horizontalalignment,
             color=color,
             verticalalignment=verticalalignment,
             transform=gca.transAxes,rotation=rotation, fontsize=fontsize);
How to Access GPN From Home
Because you work at CERN, you sometimes need to work from home... ;) This section gives you some instructions to access GPN from home.
Instructions
I copied the instruction from here.
With a Mac, the easiest way seems to be:
- create a socks via ssh to lxplus:
ssh -D 8888 lxplus.cern.ch
- configure your system preferences to use as SOCKS proxy "localhost:8888"
Now all your web traffic should be routed via lxplus.cern.ch and you should be allowed to see wikis.cern.ch or the elogbook.cern.ch.
MADX workflow with cpymad
The cpymad package offer clearly the possibility to integrate the MADX workflow with the other tools of the pythonic toolbox.
In addition to that, it give us also more flexibility to check, debug, profiling and document the MADX input files.
This can be done using the approach presented here.
You can find here a very basic example of the markdown description coming from the raw MADX file.
Here you can find a documentation of the BB mask (it is just an example, the content is presently being reviewed).
Moreover one can use this approach for profiling the execution time or the MADX variables in the different sections of your madx input.
An example of madx input can be found here toghether with the its markdown translation. A possible way to profile the code is via the following python code. In doing so one can obtain similar outputs: